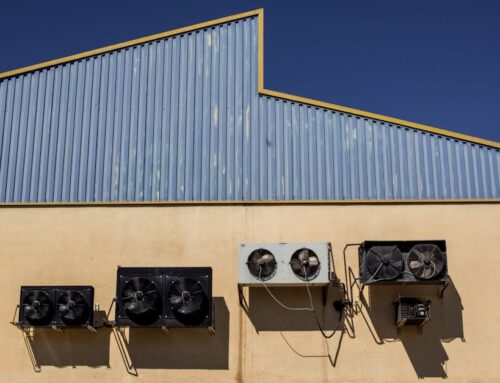

Keeping your AC unit in top condition isn’t just about staying cool; it’s also crucial for your health and wallet. An effective ac unit maintenance checklist can make all the difference. Indoor air pollution inside commercial spaces, like Frank’s building, can be two to five times worse than outside air. Poor air quality leads to respiratory problems and increased absenteeism for building occupants.
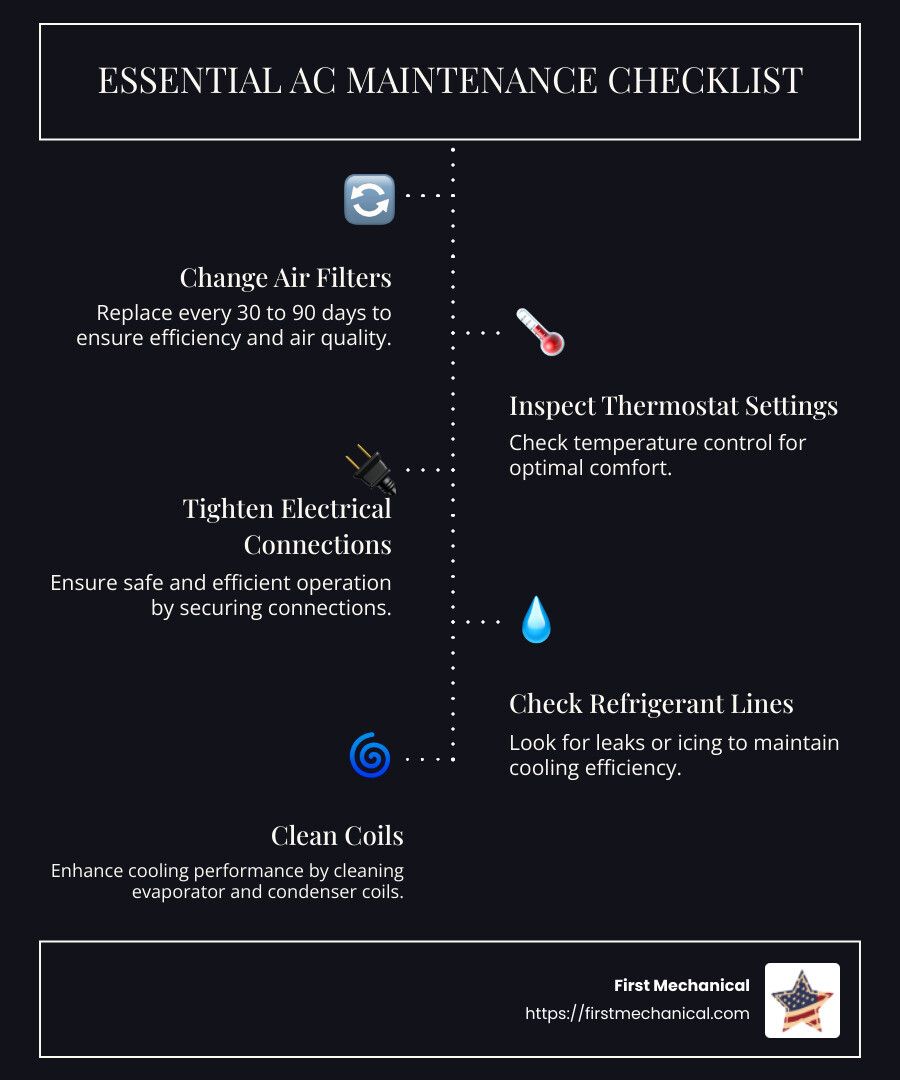
Here’s a quick rundown of essential AC maintenance tasks:
- Change air filters regularly – every 30 to 90 days.
- Inspect thermostat settings to ensure proper temperature control.
- Tighten electrical connections for safety and efficiency.
- Check refrigerant lines for leaks or icing.
- Clean evaporator and condenser coils to improve cooling performance.
- Ensure the AC unit is level and stable to prevent operational issues.
- Clear the condensate drain line to avoid clogs and mold growth.
- Inspect ductwork for leaks and cleanliness to maintain air quality.
These steps are aimed at optimizing energy efficiency and preventing costly breakdowns. A well-maintained system reduces energy consumption by up to 15%, saving money and minimizing environmental impact. Regular upkeep not only extends your system’s life but also ensures a healthier environment for tenants. To dive deeper into how each step is executed, read on.
Comprehensive AC Unit Maintenance Checklist
Keeping your AC unit in top shape isn’t just about comfort; it’s about efficiency and health too. Here’s how to ensure your system runs smoothly and efficiently:
1. Change Air Filters Regularly
Air filters trap dust and pollutants. A clogged filter makes your AC work harder, increasing energy use. Change them every 30 to 90 days to keep air clean and your system efficient.
2. Inspect and Adjust Thermostat Settings
Your thermostat controls the temperature. Make sure it’s set correctly and working well. This ensures your space stays comfortable without wasting energy.
3. Tighten and Inspect Electrical Connections
Loose connections can be dangerous. They can cause shorts or fires. Check all connections and tighten them if needed. For safety, consider getting professional help.
4. Check and Maintain Refrigerant Lines
Refrigerant lines are crucial for cooling. Look for leaks or ice buildup, which can indicate problems. If you spot issues, call a professional to fix them.
5. Clean and Inspect Evaporator and Condenser Coils
Dirty coils reduce cooling power and raise energy costs. Clean them regularly to keep your AC efficient. This task is best left to professionals to avoid damage.
6. Ensure AC Unit is Level and Stable
An uneven AC unit can lead to mechanical issues. Check that it’s level to prevent problems. If the ground shifts, consult a professional to stabilize it.
7. Inspect and Clear Condensate Drain Line
Clogs in the drain line can cause water damage and mold. Clear it regularly using a vinegar solution to prevent blockages.
8. Inspect Ductwork for Leaks and Cleanliness
Leaky or dirty ducts waste energy and reduce air quality. Inspect them for leaks and clean them with a vacuum. This keeps air flowing freely and efficiently.
By following this ac unit maintenance checklist, you can save up to 15% on energy bills, reduce your environmental footprint, and ensure a longer lifespan for your system. These steps not only save money but also create a healthier indoor environment.
Next, we’ll explore how to change air filters effectively and why it’s crucial for your AC system.
Change Air Filters Regularly
Changing air filters is one of the simplest yet most effective ways to maintain your AC unit. It directly impacts energy consumption and indoor air quality. Let’s break down why this is so important and how often you should do it.
Energy Consumption and Clogged Filters
Monthly Check
To prevent clogs, check your air filters every month. Hold the filter up to a light; if you can’t see light through it, it’s time for a change. Most filters need replacing every 30 to 90 days, depending on usage and filter type. Pleated filters can last up to 90 days, while fiberglass filters usually need monthly replacement.
How to Change Air Filters
-
Turn Off the System: Ensure your AC is off to prevent debris from circulating.
-
Locate the Filter: Find the air filter housing, typically in the return duct or air handler.
-
Remove the Old Filter: Slide it out carefully to avoid scattering dust.
-
Check the Size: Note the dimensions on the old filter and buy an identical replacement.
-
Install the New Filter: Ensure it’s facing the right direction—arrows on the frame indicate airflow direction.
-
Turn the System Back On: After installation, power up the AC and note the date for future reference.
By following these steps, you maintain optimal airflow and efficiency. A clean filter not only protects your AC but also improves indoor air quality, reducing the risk of respiratory issues.
Next, we’ll look at how to inspect and adjust your thermostat settings for optimal performance.
Inspect and Adjust Thermostat Settings
Your thermostat is the brain of your AC unit. It tells the system when to cool or heat your home. Proper settings can save energy and keep you comfortable.
Temperature Settings
Set your thermostat to a comfortable temperature when you’re home. When you’re away, adjust it by a few degrees to save energy. For example, in the summer, set it higher when you’re out, and in the winter, set it lower. This simple change can cut your energy bills by about 10% a year.
Power Supply
Ensure your thermostat has a steady power supply. If it’s battery-operated, check the batteries regularly. Weak batteries can make your system run inconsistently or not at all. If you notice your AC isn’t responding, the thermostat might need new batteries.
Cool/Heat/Off Switch
Check the mode switch on your thermostat. Make sure it’s set to ‘cool’ in the summer and ‘heat’ in the winter. It sounds simple, but this can be a common oversight. If the system isn’t running as expected, double-check this setting before assuming there’s a bigger issue.
By inspecting and adjusting your thermostat settings, you ensure that your AC unit runs efficiently. This small step in your ac unit maintenance checklist can lead to significant energy savings and improved comfort.
Next, we’ll dive into the importance of tightening and inspecting electrical connections to keep your AC running safely.
Tighten and Inspect Electrical Connections
Electrical connections are the backbone of your AC unit. They ensure that power flows smoothly and safely through the system. Safety is the top priority here, as faulty connections can lead to dangerous situations and costly repairs.
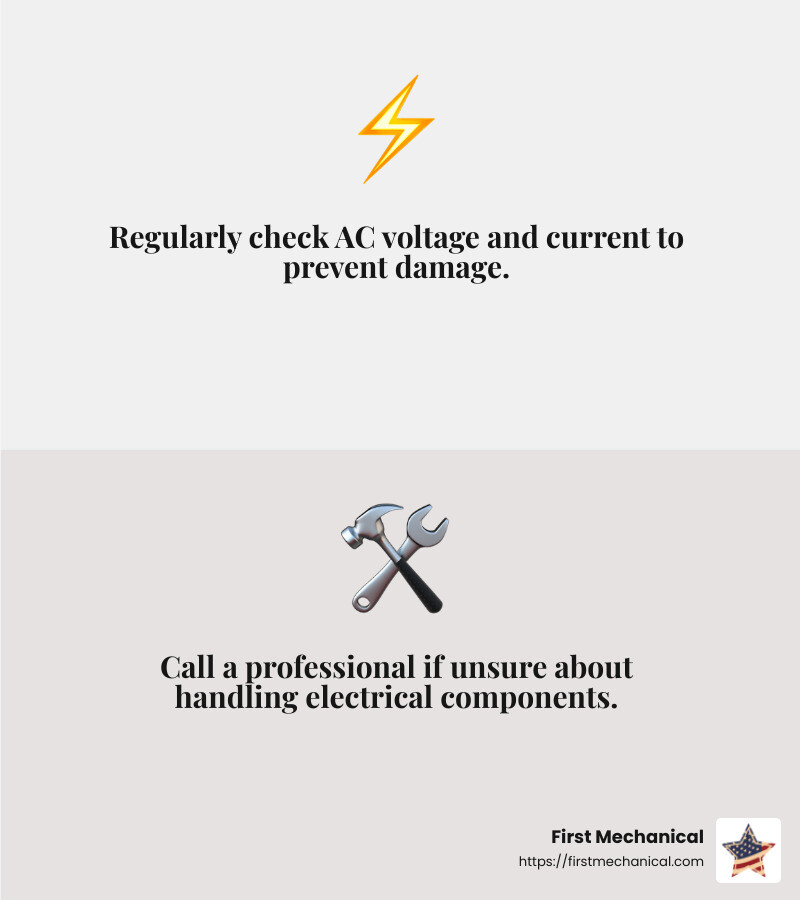
Voltage and Current
Every electrical component in your AC system operates within specific voltage and current limits. If these limits are exceeded, it can damage the parts or even cause a fire. Regularly checking that your system is operating within these safe limits is crucial.
Professional Assistance
Working with electricity can be risky. If you’re not comfortable handling electrical components, it’s best to call in a professional. A certified HVAC technician has the tools and expertise to safely inspect and tighten electrical connections. They can also measure voltage and current to ensure everything is running smoothly.
Pro Tip: If your AC is short cycling or making unusual noises, it might be an electrical issue. Don’t ignore these signs—get professional help promptly.
A thorough inspection of electrical connections is an essential part of your ac unit maintenance checklist. It helps prevent unsafe operation and extends the life of your system.
Next, we’ll explore how to check and maintain refrigerant lines to keep your AC running efficiently.
Check and Maintain Refrigerant Lines
Refrigerant lines are vital for your AC unit’s cooling process. They carry refrigerant, the substance that absorbs and releases heat, allowing your AC to cool your home. Keeping these lines in good condition is crucial for efficient operation.
Spotting Leaks
A refrigerant leak can be a serious issue. Not only does it reduce your AC’s cooling power, but it can also lead to ice buildup on the coils. This happens when the refrigerant level drops too low, causing the evaporator coil to get too cold. You might notice warm air blowing from your vents, or hear bubbling noises from the unit. If you suspect a leak, it’s time to call an expert. They have the tools to accurately detect and fix leaks.
Ice Buildup
Ice on your AC coils is a clear sign of trouble. It can cause your compressor to overheat and even damage your unit. If you see ice, turn off your AC to let it thaw. Then, check for blockages or debris around the coils that might restrict airflow. Regularly checking your refrigerant lines for leaks can help prevent ice buildup.
Professional Repair
Refrigerant issues often require professional repair. HVAC technicians can safely handle refrigerants and ensure your system is properly charged. They can also inspect and clean your coils, which improves cooling efficiency and reduces energy costs. Handling refrigerants without the right training can be dangerous and is often illegal without proper certification.
Keeping an eye on your refrigerant lines is a key part of any ac unit maintenance checklist. It ensures your AC runs smoothly and efficiently, keeping your home cool and comfortable.
Next, we’ll discuss how to clean and inspect evaporator and condenser coils to maintain optimal cooling efficiency.
Clean and Inspect Evaporator and Condenser Coils
Evaporator and condenser coils are the heart of your AC unit. They play a crucial role in the cooling process by transferring heat from inside your home to the outside. Keeping these coils clean is essential for maintaining cooling efficiency and keeping energy costs down.
Why Clean Coils Matter
Dirty coils can significantly reduce your AC unit’s efficiency. When dust and debris accumulate on the coils, they act like a blanket, insulating the coils and preventing them from effectively transferring heat. This forces your AC to work harder, leading to higher energy bills and potential system wear.
DIY Cleaning Tips
While professional cleaning is recommended for thorough maintenance, you can take some simple steps to keep your coils clean:
- Turn off the power to your AC unit. Safety first!
- Use a soft brush or cloth to gently remove dust and debris from the coils. Be careful not to bend or damage the delicate fins.
- For a deeper clean, consider using a coil cleaner spray. Follow the instructions on the product label carefully.
Professional Cleaning
For the best results, have a professional clean your coils at least once a year. HVAC technicians have the tools and expertise to thoroughly clean and inspect the coils. They can also check for signs of damage or corrosion that might affect performance.
Regular professional cleaning not only improves cooling efficiency but also extends the lifespan of your AC unit. This proactive approach can save you money on repairs and replacements in the long run.
By keeping your evaporator and condenser coils clean, you’re ensuring your AC unit operates at peak efficiency, providing you with a cool and comfortable home.
Next, let’s look at why it’s important to ensure your AC unit is level and stable for optimal performance.
Ensure AC Unit is Level and Stable
Your AC unit’s stability is crucial for its efficient operation. When the ground beneath it shifts, it can cause your unit to tilt or become unstable. This instability can lead to several problems, including damage to the unit and disconnection from your home.
Why Stability Matters
An unlevel AC unit can cause parts to wear unevenly, leading to premature breakdowns. It can also disrupt the flow of refrigerant, causing your system to work harder and use more energy. Over time, this can increase your energy costs and reduce the lifespan of your unit.
Tips for Keeping Your AC Unit Level
-
Check the Ground: Regularly inspect the ground beneath your AC unit. Look for signs of shifting or erosion, especially after heavy rain or during seasonal changes.
-
Use Stable Pads: Place your AC unit on concrete or heavy-duty pads to prevent shifting. These pads should be level and secure.
-
Monitor for Tilting: Keep an eye on your AC unit’s position. If you notice it starting to tilt, it’s time to take action.
When to Call a Professional
If you’re unsure about how to level your AC unit, or if it seems unstable, it’s best to consult a professional. HVAC technicians can assess the situation and provide solutions to keep your unit stable. They can also check for any underlying issues that might be causing the instability.
Ensuring your AC unit is level and stable not only improves its performance but also prevents unnecessary wear and tear. It’s a simple step that can save you money and headaches in the long run.
Next, let’s explore how to inspect and clear the condensate drain line to prevent clogs and mold growth.
Inspect and Clear Condensate Drain Line
Your AC unit’s condensate drain line plays a crucial role in removing excess moisture from your system. If it gets clogged, it can lead to water leaks, mold growth, and even damage to your home.
Why Clearing the Drain Line is Important
A clogged condensate drain line can cause water to back up into your AC unit, leading to water damage and creating a breeding ground for mold and bacteria. This not only affects your AC’s efficiency but can also pose health risks to you and your family.
Steps to Inspect and Clear the Drain Line
-
Locate the Drain Line: Find the drain line outside your home. It usually has a PVC cap. Inside, there’s another access point with a similar cap.
-
Use a Flashlight: Shine a light into the drain line to check for visible clogs or debris.
-
Clear the Debris: Use a wet vacuum to remove any blockages you spot. This helps in keeping the line clear and prevents water from backing up.
-
Preventative Cleaning: Pour a mixture of 50/50 vinegar and warm water down the drain line. This solution helps break down any buildup and keeps the line clear. Do this regularly to prevent clogs and mold growth.
Signs of a Clogged Drain Line
- Water Leaks: If you notice water pooling around your AC unit, it might indicate a clogged line.
- Musty Odor: A moldy smell coming from your AC vents can signal mold growth in the drain line.
When to Seek Professional Help
If you’ve cleared the line but still notice issues, it might be time to call in a professional. HVAC technicians can provide a thorough inspection and cleaning to ensure your system runs smoothly.
Regular maintenance of your condensate drain line is a simple yet effective way to keep your AC unit in top shape. It prevents costly repairs and helps maintain a healthy home environment.
Next, we’ll examine how to inspect ductwork for leaks and cleanliness to ensure optimal air circulation.
Inspect Ductwork for Leaks and Cleanliness
Your ductwork is like the highway for air in your home. If there are leaks or it’s dirty, your air circulation can suffer, leading to higher energy bills and less comfort.
Why Ductwork Matters
Leaks in your ducts mean cool air escapes before it reaches your rooms. This makes your AC work harder, costing you more money. Plus, dusty or moldy ducts can lead to poor air quality, affecting your health.
How to Inspect for Leaks
-
Visual Check: Look for obvious holes or gaps in the ductwork. Pay special attention to joints where sections meet.
-
Feel for Air: While the AC is running, feel around the ducts for escaping air. This can help you find leaks you might not see.
-
Professional Testing: Sometimes, leaks are hard to find. A professional can use special equipment to test for leaks more accurately.
Keeping Ducts Clean
-
Regular Vacuuming: Use a vacuum with a long hose to clean inside your ducts. This removes dust and debris that can block airflow.
-
Professional Cleaning: Consider having your ducts professionally cleaned every 3 to 5 years, especially if you’ve noticed dust buildup or mold.
-
Mold Prevention: Keep your ducts dry to prevent mold. If you see mold, it’s best to have a professional clean it out.
Signs of Dirty or Leaky Ducts
- Uneven Cooling: If some rooms are cooler than others, your ducts might be leaking or blocked.
- Higher Energy Bills: If your energy costs are rising without a change in usage, your ducts might be the culprit.
- Dusty Home: Excess dust around your vents can mean your ducts need cleaning.
Keeping your ductwork in good shape ensures your AC system works efficiently and keeps your home’s air clean and fresh. Next, we’ll learn how to run a final test on your AC system to ensure everything is functioning perfectly.
Run a Final Test on Your AC System
Once you’ve gone through the ac unit maintenance checklist, it’s time to run a final test. This ensures everything is working as it should and helps catch any last-minute issues.
Listen for Unusual Noises
Turn on your AC and listen closely. You should hear a steady hum, not grinding, squealing, or banging sounds. Strange noises can signal problems with the motor, fan, or other internal parts. If you notice anything odd, it might be time to call a professional.
Check System Performance
-
Temperature Consistency: Walk through your home and check for even cooling. Each room should feel about the same temperature. If not, there might be issues with your ductwork or thermostat settings.
-
Airflow: Hold your hand up to the vents. You should feel a strong, steady flow of air. Weak airflow could indicate a clogged filter or duct problems.
-
Energy Efficiency: Keep an eye on your energy bills. A sudden increase without a change in usage might mean your AC isn’t running efficiently.
Final Steps
-
Thermostat: Ensure the thermostat settings match the desired temperature. It should switch between heating, cooling, and off modes smoothly.
-
Visual Inspection: Do one last check around the unit for leaks, moisture, or anything unusual.
By running this final test, you catch any lingering issues and ensure your AC system is ready to keep you cool all season long. In the next section, we’ll answer some frequently asked questions about AC unit maintenance.
Frequently Asked Questions about AC Unit Maintenance
What should AC maintenance include?
AC maintenance is all about keeping your system running smoothly. Here’s what you should focus on:
-
Air Filters: Change them regularly. Dirty filters make your AC work harder, using more energy and costing you more money. Check them monthly and replace as needed.
-
Thermostat: Make sure it’s set to the right temperature. If it’s not working properly, your AC won’t cool your home efficiently. Adjust settings and replace batteries if necessary.
-
Refrigerant Lines: Look for leaks or ice buildup. Low refrigerant levels can cause your AC to stop cooling. If you suspect a problem, call a pro for repairs.
How often should an AC unit be serviced?
For most AC units, an annual check is a good rule of thumb. This yearly inspection ensures everything is in tip-top shape. Older units or those used frequently might need more frequent check-ups. Always follow the manufacturer’s recommendations for the best results.
What is standard HVAC maintenance?
Standard HVAC maintenance includes several key tasks:
-
Lubrication: All moving parts should be lubricated to reduce friction and wear. This helps your system run efficiently.
-
Electrical Connections: Tighten and inspect these to prevent safety hazards. Loose connections can lead to electrical failures.
-
Refrigerant Levels: Check and maintain proper levels. This ensures your AC can cool effectively without overworking.
Regular maintenance keeps your AC unit efficient, safe, and long-lasting. If you’re unsure about any maintenance tasks, consider reaching out to a professional for assistance. In the next section, we’ll wrap up with some final thoughts on partnering with First Mechanical for all your HVAC needs.
Conclusion
Partnering with First Mechanical for your HVAC needs means choosing reliability and expertise. We understand that maintaining your AC unit is crucial for ensuring comfort and efficiency in your space. That’s why we offer comprehensive professional HVAC services custom to meet your specific needs.
Regular maintenance is key to preventing unexpected breakdowns and costly repairs. With our maintenance contracts, you can rest easy knowing that your HVAC system is in the hands of seasoned professionals. We offer a range of services, from routine inspections to emergency repairs, ensuring that your system performs optimally throughout the year.
Our team is committed to providing fast response times, especially in our service areas of Tampa and Melbourne, FL. We pride ourselves on delivering top-notch service that keeps your HVAC system running smoothly and efficiently.
For more information about how our services can benefit your business, visit our Commercial HVAC Maintenance page. Let us help you keep your cool with a maintenance plan that works for you.